
After a lot of deliberation we have decided to fit an underslung freshwater tank, mainly for when we stop anywhere en-route, we will have water on tap to make drinks, without having to use bottled water. The waste water will be going into a portable tank when we are on site via an outlet underneath.
A popular source of these tanks are Caravan Accessories Kenilworth http://www.caktanks.co.uk/
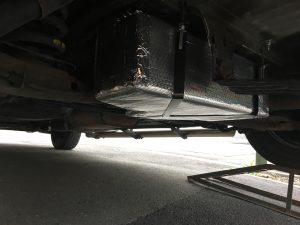
They do a dedicated tank that fits in front of the spare wheel for the t5, along with a fixing bracket, when the tank turned up, the outlet and inlet pipes were not quite where we wanted to have them. After a quick call, they said they can modify the tank for a small fee and as they are based in Coventry, we agreed I would drop the tank off.
When I arrived they told me it would be easier to make me a new tank with the inlets and outlets where I wanted them, which they did not only while I waited, but also for no extra charge. They offer an excellent service and sell pretty much any accessory you will need for your motorhome or caravan.
We had a 1.5 inch inlet fitted, a 0.5 inch outlet fitted and used the standard 3/4 drain outlet, the three white plugs in the top, allow the tank to breathe while you are filling it up, and stop any dirt ingress.

The Bracket comes in unpainted mild steel, so three coats of Hammerite will hopefully keep the rust at bay.

The bracket uses three hook bolts to secure it, the front one goes into a hole we drilled in the crossmember.

We had to modify the hook bolts by trimming down the hook end, then before we fitted the tank we wrapped it in foil bubblewrap, to try and help prevent freezing.
Two more holes were drilled in the rear crossmember and the tank was bolted up into place.
Next up was to add the water filler, we didn’t want to cut any holes in the body for a water filler, so after searching the web for some ideas, we decided to fit it under one of the rear lights behind the door.
We purchased a yacht deck filler from a boat chandler and then set about cutting a hole, this is definatley a case of measure twice cut once. There are three skins to go through, the first two are drilled perpendicular, then the third one, you have to drill down at an angle to allow for the angle of the fitting.
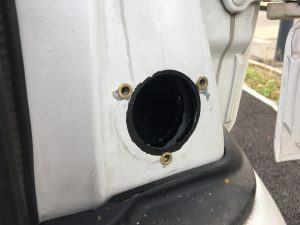
Three smaller holes are drilled and nutserts fitted as we wanted to use some nice stainless countersunk socket screws.
Then from under the van, were moved the heat shield, form the tail pipe and drilled this hole, this is where the pipe will exit.

The heat shield needed a bit of manipulation to fit back on, but once we had persuaded it, all was good.
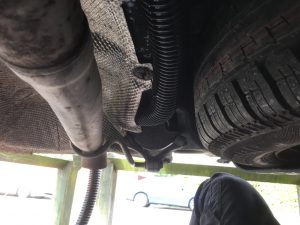
The hose was cable tied up away from the exhaust, and run to the inlet pipe on the water tank.

Before we fitted the filler, we made a gasket to prevent any water running down behind it and into the van.

In this picture you can see the angle of the filler, which is why the hole though the third metal skin is drilled at an angle.
Then it was a case of connecting the hose and screwing the filler into place.

The end result looks quite neat, and not visible when the rear doors are shut, also if a hose is left in and the flow rate is too great for the overflow valves to cope with, it won’t flood the van.
Still to fit is the drain pipe, as we are have not decided yet where to place the valve, and then there is the outlet, which we will connect up when we have the cupboards in and the water pump fitted.


